![]()
PAGE 16
I have been asked me to describe how I produce the illustrations of tokens, which are sometimes used in "Talkin’ Tokens."
OUTLINE OF PROCEDURE:
step 1. Make a large (5 to 6 inch diameter) drawing of the token in ink.
step 2. Reduce the ink drawing to the desired size.
DETAILED PROCEDURE:
I have used two methods to accomplish step one. The fastest, cheapest and least precise method is as follows:
METHOD "A" ( for fast, simple drawings)
Equipment needed:
1. an "opaque projector" (projects photos etc. from a horizontal surface to a vertical surface) to enlarge images (cost= $25.00)
opaque 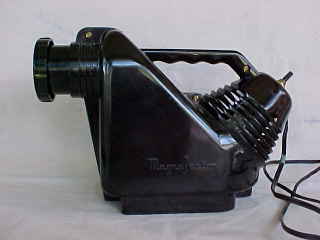 projector
2. a photocopy machine that can reduce images
In a darkened room, use the opaque projector to project an image of the token from a horizontal surface, to a white board, on which you have taped a sheet of opaque white paper (typing paper works well). The distance to the projector should be adjusted so that the image of the token is about 5 inches across. Trace the image carefully with a hard lead pencil (#4 works) using "freehand drawing". After you have finished tracing the image, move the paper to your drafting surface and ink the drawing. To trace the pencil lines in ink, I use only two pens, for fine lines I use a black ink Pilot Razor Point II pen, and for heavy outlines I use a Pentel Sign Pen.
When finished with the ink drafting, use a photocopy machine to reduce the drawing to the desired size, typically I reduce once at 50 % and reduce that image by 50 % again. Always use a white background when laying the image on the copy machine. The reduction of the original ink drawing, causes some of the imperfections in the freehand image to be less noticeable. The size of the final image should be large enough to easily read the token (keep in mind the vision limitations of some of us older collectors).
METHOD "B" (for highly detailed and more exact drawings)
Equipment needed: 1. a 35mm single lens reflex camera, with macro lens to enlarge
2. a sheet of tracing paper, a #4 pencil, and a light table
3. a photocopy machine that can enlarge and reduce images Photograph the obverse and reverse of each token. I use a Pentax 35mm single lens reflex camera, with a 35-80mm zoom lens, and 3 enlarging "filter" type attachments, purchased at Ritz Camera store for about $20. I also shoot two tokens at a time, so you get two tokens on one frame of film, which usually works nicely with the 35mm format. I try to use a background that approximates the "grayscale" of the color of the token. In order to economize, I usually shoot rolls of Fuji color film, speed of 100, roll size of 12, which can usually be bought for 99˘ per roll at Ritz Camera. I have my film processed at a Winn Dixie one hour lab, usually for less than $4 for a roll of 12, which I can normally squeeze 14-15 exposures. (This works out to about 28 token faces for around five bucks, or 17˘ per face) After the photos are developed, the image of the token should be about 2" to 3" in diameter. Overlay the photograph with clearprint tracing paper, tape everything to a light table (or to an exterior window) so that you can see the image through the tracing paper. Trace the token with the pencil. Next, enlarge the pencil tracing using the photocopy machine to about 5" in diameter. After a light photocopy enlargement is made, go over the lines on the photocopy with a Pilot Razor Point II pen. (The reason for not inking directly on the tracing paper, is that most tracing paper is too slick, and the ink will smear) The remainder of this method is identical to the last paragraph in Method "A" above.
Producing illustrations this in this manner, is neither easy, nor quick. I am sure other variations on the technique exist. The advantages that these illustrations have over rubbings, smokings, and various other methods of illustration are these:
1. The drawings reproduce clearly using our printing process at Talkin’ Tokens.
2. You can actually make a token look better than the original token (i.e. you don’t have to draw in that hole that someone drilled in your token, or the scratches, etc.)
3. Using the opaque projector (method "A"), you don’t have to physically possess the token, they can be made from photos in books, auction catalogs, etc. This is an enormous advantage.
The disadvantages are these:
1. These methods require certain equipment, and a bit of artistic talent
2. These methods require more time than most other methods, I would say a minimum of an hour per side for a simple token.
My guess, is that computer technology, digital photography, and scanning may resolve some of these illustration problems. I’m know this method isn’t for everyone, and I am not promoting it as the ultimate illustration method, but it will do for me, for now.
on to page 17 of our token web pages...
updated 5 feb 2000